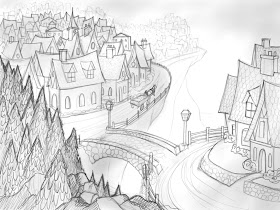
So last week I was in a boring meeting being bored...and my back was a bit stiff as I recall - BUT, I had my trusty iPad! Have I ever mentioned how much I love the iPad??? Ok, so I whipped it out (the iPad) and started free drawing with my finger - which I almost forgot to bring with me - shewwy. The sketch portion took me about 3 hours - part in the meeting and the rest while watching "Waiting For Superman" which I highly recommend.
Sometimes you might want to try out some colors before making the commitment of a full painting but you don't want to spend a lot of time. This is an easy step by step if you have photoshop - or Gimp - I haven't tried it but I'm hearing great things. I would love to hear what those of you who use Gimp think...so here is the iPad sketch:

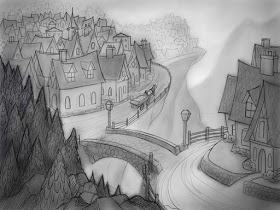
And this is layer 2 in photoshop. I make it a "multiply" layer and with the airbrush and low settings on flow and opacity I start laying in values. Anywhere you think there would be shadows or dark colors.

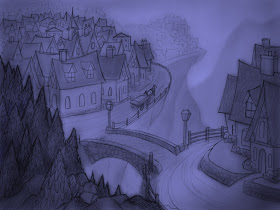
Layer 3 is the easiest layer that should take about 20 seconds or less depending on your mad photoshop skills or caffeine/blood level. Make another "multiply" layer and then pick the color that you feel best represents the overall mood or tone of the piece. In this case I knew I wanted a night scene so I went with a dark blueish purple. Select "paint bucket" and click. Done.

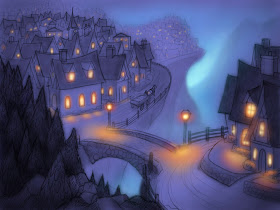
The 4th layer is where you just pick out a few highlights and that's basically it. You can get an idea if you like a color scheme pretty quick with a process like this. It was one of the steps I knew I should have taken when I worked in acrylics but didn't want to spend the time doing. Sketching on the iPad really speeds it up in that you never stop. As soon as the sketch is finished you email it to your desktop or laptop and keep working...now there's even time to check FB!

Here is a short video of the sketch process with narration - iPad/brushes app/finger

Instead of emailing it have you tried the PhotoSync app?
ReplyDeleteDoes the iPad allow you to work at 300 dpi? Is what you produce with it high res enough to print or only good enough for the web (72 dpi).
ReplyDeleteHi Will,
ReplyDeleteThat was cool. Thanks for sharing your process.
I don't have an iPad, but have a used slate tablet like the kind that is used in Medical offices. I use an open source app called MyPaint that is low memory footprint and works much the same as your Brushes app. I carry it with me and sketch whenever I can. I also use it at Life Drawing.
~John
Hey Ingvard - what is the advantage of using the photosync app? I'd love to learn...I'm on a PC does that matter?
ReplyDeleteDoug - the images generated in brushes are relativily small - 1024 x 768 which is the native resolution of the iPad screen. Good for sketching but not finishing in most cases. Definately good for medium sized web images.
John - Isn't technology amazing??!! FYI - I'm not an Apple cool aid drinker - I think they make great products most of the time and I love the iPad but that's not to say that in the future I won't be working on another device...In other words Apple better keep earning my support. :)
I can't believe you drew this with your finger. I have a couple programs on my Ipad (which I love too) and it didn't seem to work with my finger.
ReplyDeleteThis is amazing, Will! So beautiful. The colors are incredible. What program did you do this in?
Thanks for the amazing tutorials.
I should probably figure out how to do stuff like this
ReplyDeletehaha